
Are you feeling all troubled and perplexed not knowing what to do as your Epson printer is displaying error code 000031 paper jammed issue? Well, now that you have reach this site you just got to take it easy as in this blog you will be guide with the top most solution that will help rectify the problem as soon as possible. All you got to do now is read along carefully to get the desire results.
Have a look at some of the causes for Epson printer Error code 000031
You should know that they could be multiple reasons that cause the Error code 000032 in an Epson printer such as the following;
- Jam paper – if you see this error in the Epson Status Monitor then this clearly means that paper is jam in your printer which is the cause of the error. Many a time this has turned out to be true hence resolving the issue can help restore the normal functioning of your Epson printer.
- Local ink refill – this error appears when you have refilled your Epson ink tanks with inks of some local brand instead of using genuine Epson inks. Therefore the printer instantly detects the low-quality ink and stops its printing job.
- Improper waste ink disposal – You should know that there is a waste ink disposal mechanism in Epson ink tank printers. So if this mechanism is unable to function properly and cannot dispose of the waste ink efficiently, then you could encounter the Error code 000031 in your Epson printer.
Simple hacks to solve This Error:-
Before you begin with the actual process you should first try out these simple solutions to fix the error;
Solution 1 – Remove Jammed paper
Now in case the error suddenly occurred while printing with your Epson printer then it could be that paper got jammed while printing. But you can easily solve this issue by following these steps;
- You must first cancel all the existing printing jobs on your computer.
- And then you got to open the front cover of the printer and slowly remove the jammed paper. You must make sure that you carefully remove all the fragments of the printing paper in case the paper gets damaged while removing it.
- After doing so, you will need to close the front cover.
- And now you should restart your printer and then try printing again.
However, if the above solution didn’t work then you could move to solution 2 below.
Solution 2 – Refill genuine Epson ink
If you recently refilled your printer ink tanks with new ink then you must first verify that the ink you refilled is of genuine Epson ink bottles and not just some local ink. So in case if you have refilled your printer ink tank with local quality ink then you must right away empty the Epson printer ink tanks and refill them, with genuine Epson ink. And now you should have the Epson printer error code 000031 papers jammed issued and resolved successfully.
How to resolve an Epson Printer error code 000031 paper jammed?
By now you already know that ‘paper jammed’ or low-quality ink is not the cause of the error in your printer. Then it could probably be that you are facing an error because the Epson printer is not able to dispose of its waste ink properly. However, you need not worry you can have this problem fixed in no time by following the instructions below.
To get start with this repair you will need the following two tools only;
- Philips head screwdriver
- Syringe
Follow the instructions according to fix the issue with the Epson printer not being able to dispose of waste ink properly:
- To start with when your printer first encounters the issue then you will see that the power LED light and two red LED lights will blink constantly. This means that your printer is in a non-functional condition and therefore you must turn your printer off.

- Next, you will need to unplug all the connect cables of your printer, both the power cable as well as the USB cable.

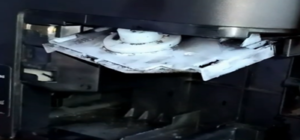
- And then you should go to the right side back of your printer and unscrew the covering lid of the waste ink pad on your printer.
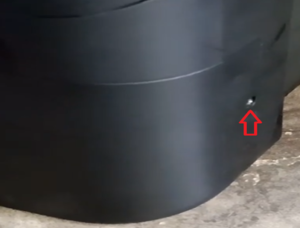
- When you are done unscrewing the cover lid then you will need to push the cover towards the backside to remove the cover.

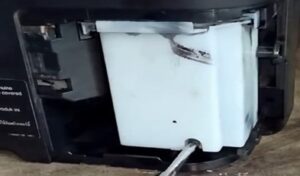
- After doing so, you should be able to see the waste ink pad box. Additionally, you need to unscrew the screw that is at the bottom and then you will be able to remove the box.

Now when the screw has been remove you must gently pull out the box and make sure that you do not apply too much pressure.

- Keep in mind that if you do pull the box out correctly then it would come out easily.
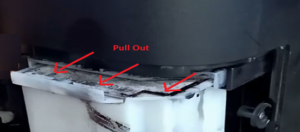
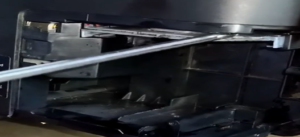
- When the box has been remove you should see a cavity over which there is a top cover lid.

- You got to pull down the top cover lid and then you should be able to see a hidden screw that is attached to that lid with the printer.

You now got to unscrew the connecting screw using your Philips screwdriver.
- When you find that the top cover lid had been unattached from the printer then you need to bring the cover lid down slowly.
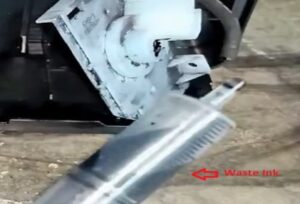
- And now you should be able to see a Black pipe that is connect to the lid. This is the pipe that brings the waste ink from the print head into the waste ink pads box; you just got to gently pull the black pipe out.

- In the next step, you got to attach the syringe to the open end of the waste ink Black pipe. After doing so you will need to try sucking the ink from the pipe into the syringe. Once you have done a few suction, then you will see that the ink is being collect into the syringe.

- When all the ink has been collect then you will need to disconnect the syringe from the Black pipe and throw it in the dustbin.
- You must now gently reattach the Black pipe with the top lid as it was attach when you took it out.

Alternatively, you should re-screw the top cover lid to the printer.

- And then you need to replace the waste ink pad box and re-screw it back to the printer.
- You also need to replace the waste ink pad printer cover and then apply the screw.

- Furthermore, you must plug in the power cable and the USB to the printer following along with restarting your printer after which the red lights should not blink. This sign means that you have fixed the Epson printer error code 000031 paper jammed issue successfully.
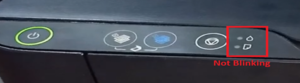
Finally, now you can go ahead and try printing and copying some pages and you should have your Epson printer working absolutely smoothly.
Tips to avoid the Epson printer error code 000032
If you want you can avoid such issues by following some precautions mentioned below:
- First of all, you must always use good quality printing paper of sizes and dimensions that are support by your Epson printer. Doing this action will surely prevent you from getting paper-jam issue.
- You need to keep in mind to refill the ink tanks with inks from genuine Epson ink bottles only.
- Most importantly, you should run print head cleaning regularly to maintain proper waste ink disposal.
Conclusion:
After you are done going through the above instructions you should be all good to fix the Epson Printer Error Code 000031 paper jam problem easily by yourself. Nevertheless, if you find it difficult or you need further assistance then you can directly contact the Geeks Tech Experts provided. And the efficient technicians will be available within no time to assist you with suitable solutions.